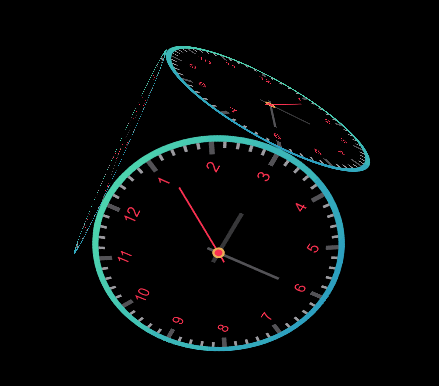
今天我们利用 canvasthreejs 基础知识来做一个可以旋转的 3D 时钟动效。效果如下:

3DClock

threejs 基础概念大家需要提前了解一下。

一、制作时钟

1、基础变量定义

1
2
3
4
5
6
7
8
9
10
11
12
13
14
15
16
17
18
var requestAnimationFrame = requestAnimationFrame || webkitRequestAnimationFrame || oRequestAnimationFrame || msRequestAnimationFrame
var canvas = document.createElement('canvas'),
ctx = canvas.getContext('2d')
canvas.setAttribute('width', 400)
canvas.setAttribute('height', 400)
// 刻画时钟
function clock () {
ctx.clearRect(0, 0, 400, 400)
let date = new Date(),
hours = date.getHours(),
minutes = date.getMinutes(),
seconds = date.getSeconds()

// 省略 ...

// 循环调用
requestAnimationFrame(clock)
}

2、画时钟边框

1
2
3
4
5
6
7
8
9
10
11
12
// 定义一个从上到下的漂亮颜色渐变
let gradient = ctx.createLinearGradient(0, 0, 0, 400)
gradient.addColorStop(0, '#48d5ae')
gradient.addColorStop(1, '#249ec2')

// 画时钟边框
ctx.beginPath()
ctx.lineWidth = 10
ctx.strokeStyle = gradient
ctx.arc(200, 200, 195, 0, 2 * Math.PI)
ctx.stroke()
ctx.closePath()

3、画分针刻度

1
2
3
4
5
6
7
8
9
10
11
12
13
14
15
16
17
18
ctx.beginPath()
ctx.lineWidth = 5
ctx.strokeStyle = '#9c9ba0'
for (let i = 0; i < 60; i++) {
// 保存画布当前状态,对画布进行变换时需要save restore,否则影响后面画布上的元素
ctx.save()
// 移动画布,将坐标原点放在时钟中心点
ctx.translate(200, 200)
// 旋转画布,每次旋转6度,60次旋转一周
ctx.rotate(i * 6 * Math.PI / 180)
// 12点方向
ctx.moveTo(0, -180)
ctx.lineTo(0, -190)
// 恢复画布之前的状态
ctx.restore()
}
ctx.stroke()
ctx.closePath()

4、画时针刻度

1
2
3
4
5
6
7
8
9
10
11
12
13
14
15
16
17
18
ctx.beginPath()
ctx.lineWidth = 8
ctx.strokeStyle = '#535257'
for (let i = 0; i < 12; i++) {
// 保存画布当前状态,对画布进行变换时需要save restore,否则影响后面画布上的元素
ctx.save()
// 移动画布,将坐标原点放在时钟中心点
ctx.translate(200, 200)
// 旋转画布,每次旋转30度,12次旋转一周
ctx.rotate(i * 30 * Math.PI / 180)
// 12点方向
ctx.moveTo(0, -170)
ctx.lineTo(0, -190)
// 恢复画布之前的状态
ctx.restore()
}
ctx.stroke()
ctx.closePath()

5、画时间点

1
2
3
4
5
6
7
8
9
10
11
12
13
14
15
ctx.beginPath()
ctx.save()
ctx.translate(200, 200)
ctx.font = '26px Arial'
ctx.textAlign = 'center'
ctx.textBaseline = 'middle'
for (var n = 0; n < 12; n++) {
// n * (Math.PI * 2) / 12 代表3点
var theta = (n - 2) * (Math.PI * 2) / 12;
var x = 150 * Math.cos(theta);
var y = 150 * Math.sin(theta);
ctx.fillText(n + 1, x, y);
}
ctx.restore()
ctx.closePath()

6、画时针

1
2
3
4
5
6
7
8
9
10
11
12
13
ctx.beginPath()
ctx.save()
ctx.lineWidth = 7
ctx.strokeStyle = '#38383b'
ctx.translate(200, 200)
// 每小时30度
ctx.rotate(hours % 12 * 30 * Math.PI / 180)
ctx.moveTo(0, 20)
// 12点方向
ctx.lineTo(0, -80)
ctx.stroke()
ctx.restore()
ctx.closePath()

7、画分针

1
2
3
4
5
6
7
8
9
10
11
12
ctx.beginPath()
ctx.save()
ctx.lineWidth = 5
ctx.translate(200, 200)
// 每分钟6度
ctx.rotate(minutes * 6 * Math.PI / 180)
ctx.moveTo(0, 20)
// 12点方向
ctx.lineTo(0, -110)
ctx.stroke()
ctx.restore()
ctx.closePath()

8、画秒针

1
2
3
4
5
6
7
8
9
10
11
12
13
ctx.beginPath()
ctx.save()
ctx.lineWidth = 3
ctx.strokeStyle = '#FD3351'
ctx.translate(200, 200)
// 每秒钟6度
ctx.rotate(seconds * 6 * Math.PI / 180)
ctx.moveTo(0, 20)
// 12点方向
ctx.lineTo(0, -130)
ctx.stroke()
ctx.restore()
ctx.closePath()

9、画时钟圆心

1
2
3
4
5
6
7
8
9
10
ctx.beginPath()
ctx.fillStyle = '#edb052'
ctx.arc(200, 200, 10, 0, 2 * Math.PI)
ctx.fill()
ctx.closePath()
ctx.beginPath()
ctx.fillStyle = '#ff364e'
ctx.arc(200, 200, 6, 0, 2 * Math.PI)
ctx.fill()
ctx.closePath()

😇 到此时钟刻画完毕。

二、添加动画

这里需要大家提前查阅资料了解 渲染器 场景 相机 模型 几何体 材料 纹理 几个名词的概念。

附上我简单鄙陋的理解:渲染器可以将场景渲染出来。场景由模型构建。相机有透视相机和正交相机之分,在不同角度不同相机的照射下场景会展示出不同的效果。模型由几何体组成。几何体由材料填充。材料由纹理修饰,纹理可以是图片,也可以是画布。

js 代码如下:

1
2
3
4
5
6
7
8
9
10
11
12
13
14
15
16
17
18
19
20
21
22
23
24
25
26
27
28
29
30
31
32
33
34
35
36
37
38
39
40
41
42
43
44
45
46
47
48
49
50
51
52
53
// 定义变量:渲染器 场景 相机 模型 几何体 材料 纹理
var renderer, scene, camera, mesh, geometry, material, texture
// 页面入口函数
function start () {
// 定义时钟
clock()
// 定义 3D 场景
init()
// 定义动画
animate()
}
function init () {
// 创建渲染对象
renderer = new THREE.WebGLRenderer()
renderer.setSize(window.innerWidth, window.innerHeight)
document.body.appendChild(renderer.domElement)
// 创建透视相机
camera = new THREE.PerspectiveCamera(70, window.innerWidth / window.innerHeight, 1, 1000)
camera.position.z = 600
// 创建场景对象
scene = new THREE.Scene()
// 创建几何体对象
var geometry = new THREE.CubeGeometry(200, 200, 200)
// 创建纹理(即时钟)
texture = new THREE.Texture(canvas)
// 将纹理传递给材质
material = new THREE.MeshBasicMaterial({ map: texture })
texture.needsUpdate = true
// 创建模型
mesh = new THREE.Mesh(geometry, material)
// 将模型添加到场景
scene.add(mesh)
renderer.clear()
// 场景渲染
renderer.render(scene, camera)
}
function animate () {
texture.needsUpdate = true
mesh.rotation.y -= 0.01
mesh.rotation.x -= 0.01
requestAnimationFrame(animate)
renderer.clear()
renderer.render(scene, camera)
}
// 起始函数调用
start()

function resize () {
camera.aspect = window.innerWidth / window.innerHeight
camera.updateProjectionMatrix()
renderer.setSize(window.innerWidth, window.innerHeight)
}
window.addEventListener('resize', resize)

终于大功告成!

查看demo

😋😋😋